Visual Studio Code - C/C++ Setup
Table of Contents
Visual Studio Code is a great open-source editor with plenty of useful plugins for insane amount of languages and frameworks.
However, as C and C++ environment is pretty janky for today’s standards, so is the configuration. So i made this guide to streamline the process and make it easy for somebody new in C, C++ or VSCode to setup a reasonably working dev environment with some useful quality-of-life tools. It might not be IntelliJ-level of quality, but hey - it’s free.
In this guide, i will tell you:
- What tools you’ll need to start developing C and C++ apps in VSCode
- What extensions you might want to install to ease up the code writing process, and how to configure them
- How do you create a C/C++ project in VSCode (with CMake) and integrate it with VSCode
Prerequisites⌗
VSCode⌗
The obvious prerequisite is Visual Studio Code. Install it from the official site: https://code.visualstudio.com/, or from a repository if you’re using a package manager.
For Windows: either download the installer from official site and run it, or install VSCode via scoop: scoop install vscode. btw; i strongly recommend scoop - great package manager
For Linux: if you have it in your package manager repository, install it from there. Otherwise, use the installer from official site.
For MacOS: same as for Linux. Probably. I don’t use MacOS so i can’t really tell.
Fun fact; there are two versions of VSCode you can find on the internet and in package managers - OSS version, and Non-OSS. The OSS version is basically the VSCode you’d get by downloading it from official repository and building it yourself. Non-OSS version is the one from Microsoft distribution (for example, their official site), and the only difference between them is that Non-OSS version uses some Microsoft propertiary code, while OSS doesn’t. There is some functional difference (IIRC, OSS version lacks proprietary features like Settings Sync or Remote WSL/SSH/Containers), but both are fully compatible in terms of plugins and configuration, so you usually don’t need to worry about the exact version you’ve installed.
C/C++ Toolchain⌗
There are many C/C++ toolchains available, and i’m not gonna enforce one, because this guide is mostly toolchain-independent (in the end we’re gonna use build system, but most of the examples are for GCC). However, if you are new to C/C++, i’d recommend starting with GCC (or MinGW, if you’re on Windows) as it’s easy to install and use out of the box.
If you already have your preferred toolchain installed and configured, feel free to go to the next step. If not, here’s the guide:
For Windows:
My usual way of installing C++ toolchain on Windows is via WinLibs package. To install it:
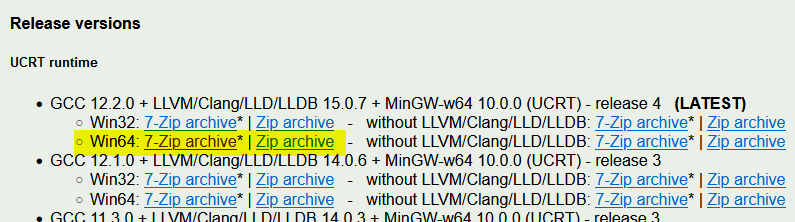
- Download latest UCRT runtime version for Win64 (i assume you’re running at least Win10 64bit, otherwise read the instructions on WinLibs page).
- Extract it somewhere - preferably directly to a hard drive, for example
C:\, but it can be anywhere. I recommend avoiding paths with spaces and non-ASCII characters though, they may cause headaches in the future.
- Add
/binsubdirectory to system or userPATHvariable.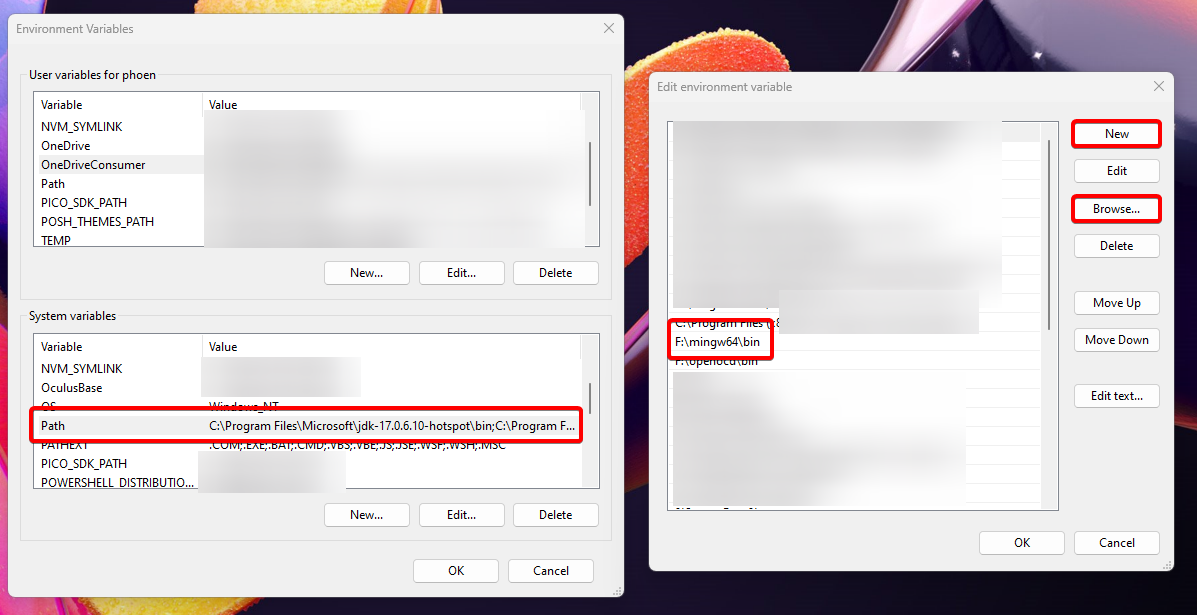
- Open terminal and run
gcc --versioncommand. You should see similar message to the one below. You may also want to runwhere.exe gccto make sure you’re using correct GCC executable, in case you’d have other GCC installation in the system that you forgot about - usually, WinLibs provides most recent one, so this is the one you should be using.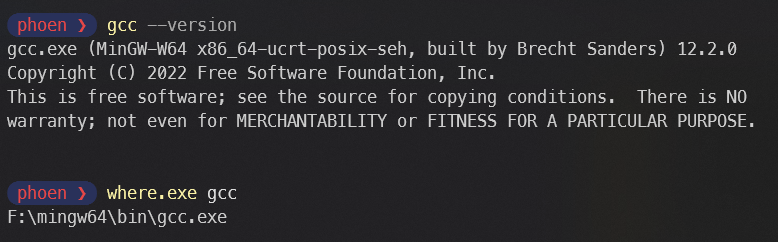
If you’d rather use different toolchain than GCC, i recommend Visual C++, which you can install via Build Tools for Visual Studio 2022. You can download it from here. To install C++ toolchain, run the installer and select the option “Desktop development with C++”. 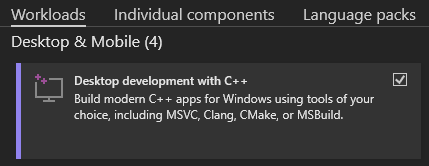 Note that you don’t need both toolchains, one is enough, and that build tools do not include Visual Studio - if you want Visual Studio, you can install it as separate product using the same installer. Since this guide is about Visual Studio Code, which is a different product, i’m not going to provide instructions for that.
For Linux:
Usually, you should have GCC in your repository. On Ubuntu, Debian and similar distributions (Mint, Kubuntu, Lubuntu, PopOS!, Zorin, and so on), you have build-essential package with most tools needed to build C/C++ programs.
On Arch Linux and similar distributions (Manjaro), you have base-devel package.
On other distributions, search for similar package or install latest gcc and g++ packages from your repository.
Test it the same way as on Windows - open terminal and try gcc --version, see what happens.
You also have to install gdb (GCC debugger) separately, as it may not come with the base development packages, and you definitely do want to have it and use it.
For MacOS: probably same thing as on Linux, look for GCC (or any other preferred toolchain) in package manager and install it from there. Verify the installation the same way as on Linux.
VSCode Essential Plugins⌗
If you already have working C/C++ toolchain, time to run VSCode and install some plugins. Run VSCode and go to the Extensions menu.
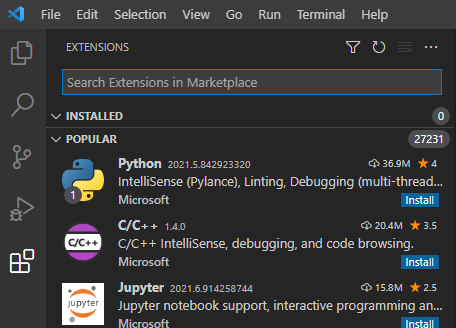
Now, for some general C++ plugins:
- C/C++ - that’s the core extension we’ll need. It contains the fundamental stuff to work with C/C++ in VSCode.
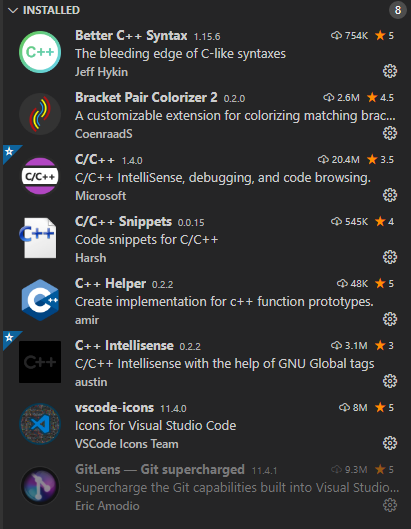
- Better C++ Syntax - it’s always nice to have better syntax colouring, so i strongly recommend that one. You might want to use one of the themes from this extension description to get full experience.
- C/C++ Snippets - pretty useful extension that adds automatic generation of snippets in C/C++ code - instead of writing loops, structures and class definitions by hand, you can generate them with autocompletion support.
- C++ Intellisense - pretty good plugin with some intelligent autocompletion features.
- C++ Helper - simple extension which adds automatic function definition generation feature.
- C-mantic - very useful plugin that adds auto-generation of function definitions, getters, setters and more. An alternative to C++ Helper - pick whatever seems more ergonomic for you.
And i’d also recommend these:
- Bracket Pair Colorizer 2 - very useful extension which colorize the matching bracket pairs, increasing code clarity. Strongly recommended.
- GitLens - if you want to work with Git repositories, that’s the extension you’re looking for. You need
gitinstalled to use it! - Material Icon Theme - better looking than default ones
With these plugins, you will have a pretty decent bare-bones environment to work with C and C++. You’ll have autocompletion, some refactoring features, some code generation and a pretty decent syntax highlighting. The screenshot below is outdated - use the list above for updated recommended plugins
I have one more plugin to show you, an alternative language server with many useful features, but i’ll leave it as a bonus at the end of this guide, because it needs a bit more configuration. Make sure to check it out!
Creating a project - VSCode and CMake⌗
We’ll start with something simple. As i’ve mentioned before, i’m not gonna teach you how to make a raw VSCode project, which builds the app from scratch and without any other tools, because that’s simply painful, not really scalable, and not worth the trouble.
Instead, i’m gonna teach you how to use a build system.
But what’s a build system?⌗
Well, build system is a tool that tells the toolchain (compiler and his friends) how to create a program out of all the source (and resource) files you’ve created. And sometimes does other things, but that’s out of this tutorial scope.
Without it, you’d have to enter the toolchain commands manually each time you’d want to build the application. That’s fine for small apps with one, two or maybe five files. But it gets messy when your program starts to grow.
So, for example, assuming you use gcc, to build your C program manually, you’d have to enter something like this:
gcc [list of your source files] [some fancy flags for your compiler] [maybe some flags telling the compiler where the libraries are] -o program.exe
An actual example would be:
gcc main.c lib.c lib2.c -O2 -Wall -Wextra -L./some/lib -lmylib -lsomeotherlib -o program.exe
That doesn’t look so bad, right? You could even put this command in some shell script and easily run it every time you’d like to build the code. But then, you’d have to change this command every time your project structure changes - so, every time you add a new file, or library, or change some directory name, you gotta edit this script. And yes, i know that wildcards exist, but for the sake of this example i’m gonna ignore them.
Another issue is that if you’d want to give this code to your friend or teacher, he would either have to use the same shell as you, and gcc, or write his own build script (or project) for the compiler/shell he’s using, and that’s not very user-friendly (or, rather, programmer-friendly) solution.
There are also some other issues with manual building, but the point is: manual building is not comfortable or scalable on a larger scale. So, we’ll use a build system to do it for us and make everyone’s life easier!
Bonus note: Tool i’m going to talk about next - CMake - isn’t technically a build system. It’s a meta-build system. The difference between those is that build system runs the toolchain commands directly, while meta-build system generates the build system files. Basically, meta-build systems are more flexible, and sometimes easier to use, therefore we’re gonna use one.
Bonus note number two: originally, i was going to show how to use Premake and CMake, but due to some pretty bad issues with Premake i’ve decided to stay with CMake. I’ll probably make a Premake guide in the future.
Okay, how do i use it?⌗
Well, let’s start with installation. You can either install it from your package manager, just like VSCode, or download from official site. Make sure to add CMake to your PATH variable if you’re using an official installer!.
Important note: if you’re using your package manager, check the CMake version after installation (
cmake --versioncommand). I’m gonna use some stuff that was added in CMake 3.12, but from what i can see, some older Linux distributions (like Ubuntu 18.04) still have CMake 3.10 in their repositories, so if that’s the case i strongly recommend installing newer version manually. If that’s not possible, i’ll tell what things come from CMake 3.12 and how to make a workaround.
Done? Great. Now a little bit of theory.
How does CMake work?⌗
CMake is a meta-build system. As i’ve mentioned earlier, it means that when we run it, it should give us a project for a build system of our choice, which we can use to build our application. To tell CMake how it should generate the project, a CMakeLists.txt file is used. This file includes the project configuration, written in CMake’s scripting language.
Some toolchains - like GCC, MinGW or Visual C++ - come with their own build systems. In case of GCC/MinGW, it’s GNU Make. In case of Visual C++, it’s MSBuild. CMake can generate the necessary files for these build systems, and then we can use them to build the whole project with a single command. Pretty convenient.
Creating a simple project⌗
Let’s open VSCode (or restart, if you had it opened while installing CMake) and add some extensions.
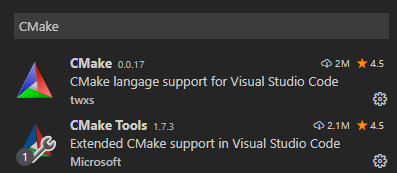
These two plugins will enable CMakeLists.txt syntax highlighting and CMake integration for VSCode. And this integration is a very powerful and helpful tool, as we’ll see in a bit. You can also install a cmake-format extension, if you have Python installed and follow the plugin’s installation guide
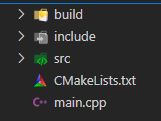
Now, make a folder for our new project and create a simple main.cpp (or main.c, if you want to code in C):
C++ version:
#include <iostream>

int main() {
  std::cout << "Hello, world!" << std::endl;
}
C version:
#include <stdio.h>

int main() {
  printf("Hello, world!\n");
}
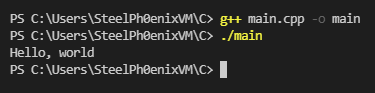
You can check if your toolchain works correctly by building the app manually. If you’re using GCC or MinGW, open up integrated VSCode terminal with Ctrl+` command (or Ctrl+Shift+` to create a new one), and run:
C++: g++ main.cpp -o main
C: gcc main.c -o main
And then run the app with ./main command. You should see your Hello World printed in terminal.
If that doesn’t work, make sure you have correctly added your toolchain to PATH variable.
Now, we can proceed with CMake. Delete the compiled program main you just created and tested, and create a CMakeLists.txt file in the same directory as your code file. We’ll start with bare-bones template and then we’ll expand it a little.
Put this code into CMakeLists.txt:
cmake_minimum_required(VERSION 3.12)

# Change CXX to C, if you're making a C program
project(HelloWorld LANGUAGES CXX)

# Change main.cpp to main.c, if you're making a C program
add_executable(${PROJECT_NAME} main.cpp)
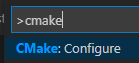
And then open up the VSCode command list with Ctrl+Shift+P shortcut, and look for CMake: Configure option. Run it.
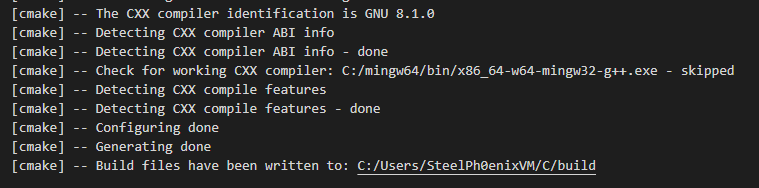
Next, you should see a list of detected toolchains installed in your system. Pick one.

After that, VSCode will run CMake and configure the project for the first time. You should see similar output in your VSCode output window:
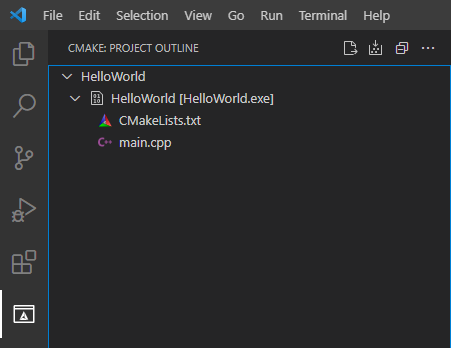
From now on, VSCode will automatically run CMake every time you change CMakeLists.txt to re-generate the project files. You should also see a new menu on left-side toolbar
Building your program⌗
So, we have a project now. How do we build it, and how do we run our program?
Thankfully, CMake plugin for VSCode got us covered. To build the program, either use F7 shortcut, look for the CMake: Build command in command list, or press the Build button either on VSCode bottom bar, or in CMake menu.


You should see similar output in VSCode output window:

Running your program⌗
Now, let’s run it. Press the Run button on the bottom VSCode bar:

And the app should run without any issues. The output should be in terminal window.

Is that it?⌗
Of course not - there’s always more!
But yeah, we just created a very simple project with CMake + VSCode, built it and ran it. Now, let’s talk what actually happened and how can we expand our project.
CMake 101 - how does it work?⌗
CMake, as i’ve mentioned multiple times, is a tool that generates the project files used to build it. However, it can also be used for some other things - like application packaging, managing tests, configuring the project, and so on. At the moment CMake is an industry standard, which means that most of the C and C++ projects have CMake support, therefore it’s a very versatile tool. Not the best, but versatile.
You may notice that after configuring the project a new directory appeared in your project folder, called build. Let’s peek into it.
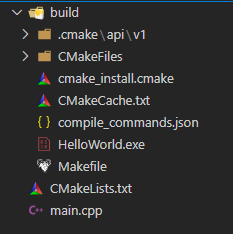
You are usually not supposed to touch and modify these files, as CMake manages them, but i’ll still explain the function of some of the more important ones:
CMakeCache.txt- inside that file, you can find a list of CMake variables that are used in project generation process. You can find the toolchain paths, compiler flags, user and many different configuration variables there.compile_commands.json- that file contains a list of commands used to build your program. This list can be used by some code analyzing tools (and i’ll describe one at the end of this guide).HelloWorld.exe- hey, that’s our program!Makefile- this file is used by GNU Make to build our program. Basically, that’s the final CMake output. If you’re using a different toochain with different build system, like Visual C++, you will get a different file (usually, a whole Visual Studio solution, so maybe even a whole directory).
CMakeLists - what’s inside?⌗
Let’s analyze our CMakeLists.txt
cmake_minimum_required(VERSION 3.12)

# Change CXX to C, if you're making a C program
project(HelloWorld LANGUAGES CXX)

# Change main.cpp to main.c, if you're making a C program
add_executable(${PROJECT_NAME} main.cpp)
cmake_minimum_requireddefines the minimal version of CMake required to generate this project. We’ll use 3.12 because i’m gonna show you some stuff that was added in this version.projectdefines our project. We can also add information about version, project description, homepage and used languages - which we do in that case.add_executabletells CMake to generate a code that will build an executable file with specified name from specified source files.${PROJECT_NAME}is a CMake variable containing the project name defined byprojectcommand.
It’s important that add_executable requires a full list of all the source files making up the program. So, in theory, you would have to add every single source file to the list manually, like that: add_executable(${PROJECT_NAME} main.cpp a.cpp b.cpp [...]), but fortunately that’s not necessary. We can use file command to generate that list for us.
Expanding our project - adding more files⌗
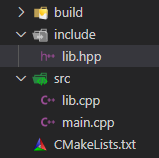
Let’s add some more files for our project. First, create two new directories - include and src in root project directory:
Now, move the main.cpp (or main.c) to src directory, and make a new file called lib.cpp (or lib.c) there. Put this code inside:
C++ version:
#include "lib.hpp"
#include <iostream>

void f(int x) {
    std::cout << "Hello, i'm a library!\nx = " << x << std::endl;
}
C version:
#include "lib.h"
#include <stdio.h>

void f(int x) {
    printf("Hello, i'm a library!\nx = %d\n", x);
}
Then, add a lib.hpp (or lib.h) file inside include directory. Put this inside:
#pragma once

void f(int x);
The project should look like this now:
Let’s update the CMakeLists.txt.
We’ll use two new commands now: file and include_directories. file command will generate the list of source files, while include_directories will tell our toolchain where to look for header files.
cmake_minimum_required(VERSION 3.12)

# Change CXX to C, if you're making a C program
project(HelloWorld LANGUAGES CXX)

# Change *.cpp to *.c, if you're making a C program
file(GLOB PROJECT_SOURCE_FILES CONFIGURE_DEPENDS src/*.cpp)
include_directories(include/)

# Change main.cpp to main.c, if you're making a C program
add_executable(${PROJECT_NAME} ${PROJECT_SOURCE_FILES})
file(GLOB PROJECT_SOURCE_FILES CONFIGURE_DEPENDS src/*.cpp)- this command generates the list of files fromsrcdir with.cppextension, and stores it inPROJECT_SOURCE_FILESvariable. TheCONFIGURE_DEPENDSflag was added in CMake 3.12, and thanks to it, the list of files will be automatically re-generated every time we add a new file to the project. The command will work without it, but then you would have to manually regenerate CMake project after adding new files.include_directoriestells the toolchain where to look for header files.
The PROJECT_SOURCE_FILES variable should have a list of all of our code files, and we’ll pass it to add_executable instead of adding a new file manually.
Of course, this variable can be called anyhow you want - it’s not a special name or anything.
Now, let’s configure our project again (VSCode should do this automatically, but i wanna show you how to do it in case it doesn’t). Right-click on CMakeLists.txt and select “Configure All Projects”
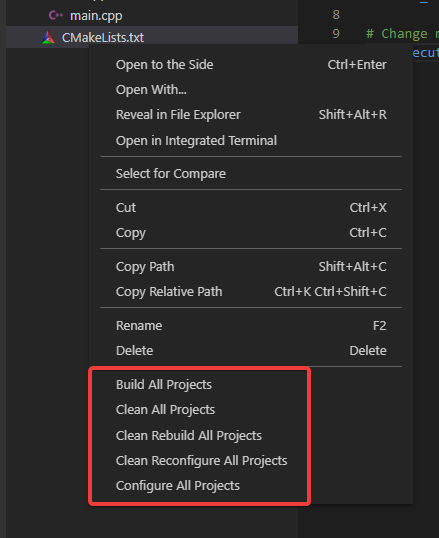
Sometimes, when something goes wrong and CMake or VSCode starts behaving strange or getting buggy, it’s good to clean up and reconfigure the project (“Clean Reconfigure All Projects” and “Clean Rebuild All Projects”). This can sometimes happen when playing with CMakeLists.
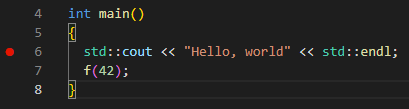
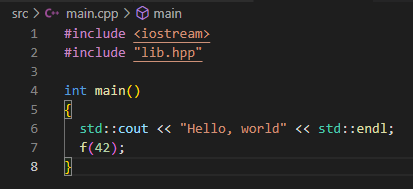
Let’s add some code to our main.cpp (or main.c) to test if additional files are added properly to our project:
C++ version:
#include <iostream>
#include "lib.hpp"

int main() {
    std::cout << "Hello, world" << std::endl;
    f(42);
}
C version:
#include <stdio.h>
#include "lib.h"

int main() {
    printf("Hello, world!\n");
    f(42);
}
Now, we should be able to build our program

And run it

At this point, everything should work automatically. You should be able to add new source files to src dir, and new headers to include, and CMake should handle them without having to touch CMakeLists.txt manually. Adding new directories with source/include files is done the same way - just file the source files, add include path with include_directories and voila.
Debugging our code⌗
Time for a last step in our setup - using a debugger. Fortunately, CMake integration does most of the work for us here.
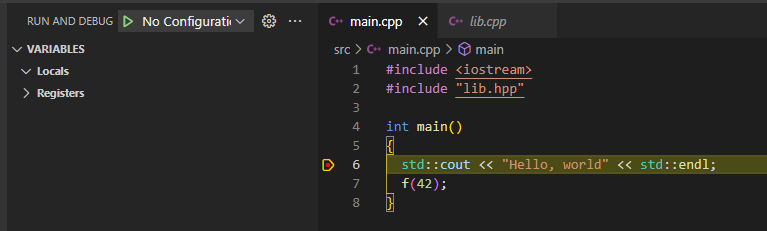
Let’s add a breakpoint in the first line of our main function - click on the left of line number, you should see a red dot:
And start a debugging session by pressing a little bug icon on the bottom of VSCode window, or by using CMake: Debug command
![]()

VSCode should now switch into debugging perspective and program should stop at breakpoint.
And that’s basically it. Don’t worry about lack of configuration for run/debug in VSCode - CMake integration does everything for us, so there’s no need to make them. Just make sure you run/debug the program via CMake commands in VSCode, instead of it’s own. Setting up the run/debug configs manually can be pretty annoying at the times, so that’s a subject for another guide.
There’s one subject i haven’t touched yet, and it’s adding external libraries. Since this guide is already long enough, i’ll make another one for that. Now, it’s the time for some bonus content.
Bonus: clangd setup⌗
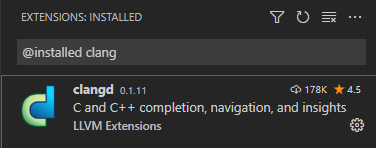
clangd is a language server for C++. It provides functionalities like code completion, code linting (showing warning and errors in real-time), simple refactoring, and so on. There is a C++ language server in VSCode already, as we installed C/C++ extension, but clangd is better in some ways, and it’s more multi-platform (default VSCode C++ language server doesn’t work on ARM yet, so if you wanna code on RaspberryPi via SSH - clangd is your best friend).
In order to work, clangd requires compile_commands.json file to know how your code is compiled and with what flags. Fortunately for us, CMake generates that file automatically, so no further configuration is required on our side!
Right after the plugin installation, you should see a popup like this one:
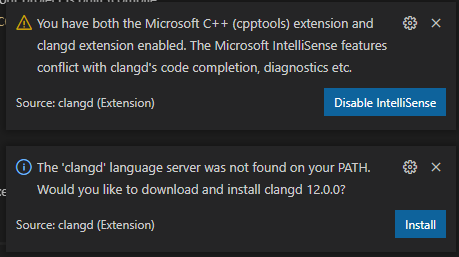
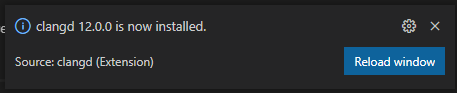
In order for clangd to work, you have to disable the default Intellisense server (press Disable IntelliSense), and download clangd binary (which VSCode does for us). After it’s downloaded, you should see this popup:
Reload the window, open up a C/C++ source file, and check if clangd info is displayed on the bottom of the screen
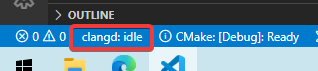
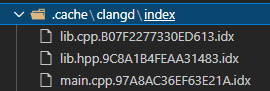
If that’s the case, congratulations, it should work now. Check if there’s no include errors, and if the autocompletion works (you can manually trigger autocompletion with Ctrl+Space shortcut). There should also be a .cache directory in your project folder now, with clangd’s cache files - make sure to add it to .gitignore before making a commit :P
Full list of clangd features can be found here: https://clangd.llvm.org/features.html. I strongly recommend checking it out.
Clang-Format setup⌗
clangd embeds clang-format support, which is a code formatting tool - one of the best in C and C++ environment. clang-format allows you to manually or automatically format the code (for example, on-save, format-while-typing is not yet supported with clangd) according to your preferences, which you can set by creating .clang-format file in your workspace root, with configuration options for clang-format.
The list of configuration options is pretty long and can be found here: https://clang.llvm.org/docs/ClangFormatStyleOptions.html. I’m not gonna describe them all of course, i’ll just show an setup example.
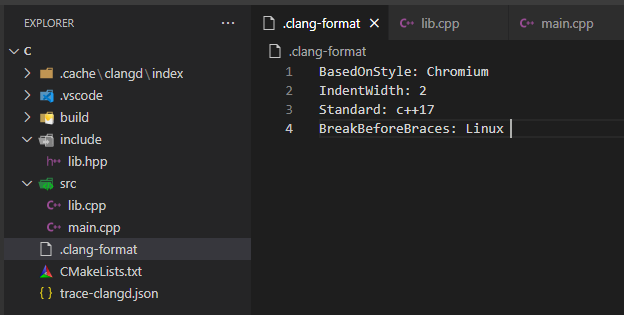
Let’s create a .clang-format file in our workspace root dir, and put this inside:
BasedOnStyle: Chromium
IndentWidth: 2
Standard: c++17
BreakBeforeBraces: Linux
If clangd is the only formatter you have installed, it should be treated as default. If not, make sure it is by opening command list (Ctrl+Shift+P), looking for Format Document With... option, and setting default formatter to clangd.
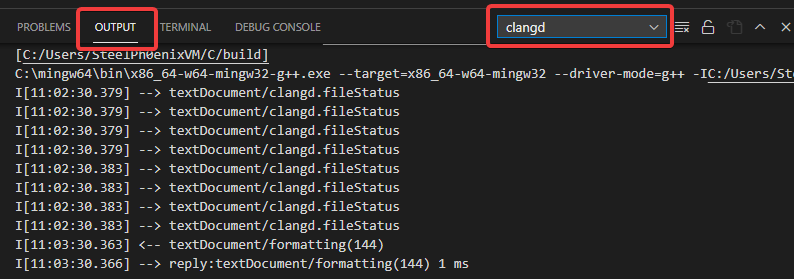
Now, open a main file and either right-click and pick Format document option, or use a shortcut (Shift+Alt+F on Windows by default). The code should now look like this:
If it had been formatted differently, check the clangd output in VSCode window. All the issues and errors with .clang-format file should be there.
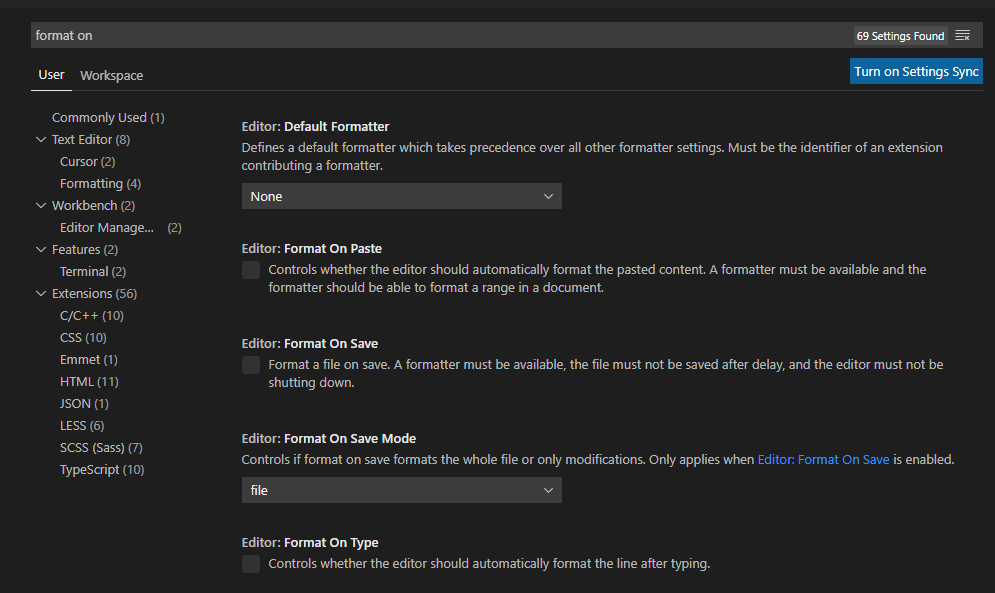
You can set autoformatting in VSCode settings - open settings window with Ctrl+, or File -> Preferences -> Settings, and look for format on options
Summary⌗
And that would be it. I hope it’s not too long.
If there are any issues or questions about the guide itself or the setup process, feel free to contact me!